December 29, 2023

Improving Electrify America and EV Charging

Last year my wife and I purchased our first electric car - a Hyundai Ioniq 5 - and we love it! Range anxiety is mostly not an issue and the included 120V charger is enough to keep our battery topped up for most of our daily driving. For longer trips we’ve been relying on the included two years of free 30 minute Electrify America sessions that come with each Ioniq 5. As the number of EVs on road continues to increase, however, the EA network is struggling to scale. During most of our trips to an EA station we’ve seen many broken charging stations and lines of cars waiting to charge.

ICE cars, gas stations, rest stops, etc have had over 100 years to get to where they are. Most drivers know how to fill up a car with the right type of fuel. Gas stations are designed to easily drive through so that cars can form a queue. Filling a tank of gas only takes about 5 minutes and pump can fill at the same rate from empty to full. This all changes with EVs.

How fast can my car charge?

Unlike a gas pump which can fill all cars at the same rate from empty to full, EVs have a more complex charging rate that’s based on a combination of the station, the car’s EV architecture, and the car’s charging curve.

Station speed and the car

Not all EVs can charge at the fastest rates. Most EVs can’t charge faster than 150 kW. Why does this matter? If there’s a line of cars waiting to charge, a mismatch between charging speeds can really slow things down. For example:

At a 150 kW charging station one 2022 Hyundai Kona would take 44 minutes to charge up to 80% because it can never charge faster than 77 kW. Even at a 350 kW “hyper fast” charger the car is still only charging at 77 kW.

EVCar’s max charging speed10 to 80% at 150 kW10 to 80% at 350 kW
Hyundai Kona77 kW44 min44 min
Hyundai Ioniq 5233 kW22 min17 min
Note: Filling a gas tank for a similar range would take about 2 minutes.

If a Kona were to arrive first and choose the “hyper fast” charger, they add 5 minutes charging time for the Ioniq while they still have to wait the same 44 minutes. Five minutes may not seem like much, but if there’s a queue of cars waiting this can really add up.

The charging curve

So far we’ve only charged to 80%, however. What happens if a car charges beyond that? All EVs slow the charging speed as the battery fills up to help protect the it. Charging the last 20% of a car’s battery can easily double the total charging time.

EVCar’s max charging speed10 to 100% at 150 kW10 to 100% at 350 kW
Hyundai Kona77 kW124 min124 min
Hyundai Ioniq 5233 kW50 min45 min

One Kona charging to 100% takes as long as 3 Ioniq 5s. If those Ioniqs are charging to only 80% 7 cars could’ve charged in the time it took the Kona to get to 100%.

These estimates are under ideal conditions and assuming all cars show up at the same time and don’t linger at the station after they finish charging. In less ideal conditions a single slow charging car on a fast charger can create serious backups.

This stuff is complicated and most EV owners don’t know about it (and they shouldn’t have to!). Names like “hyper” and “ultra” are meaningless, dealers don’t educate, and really the end-user shouldn’t have to be thinking about this math every time they charge.

How do we improve?

So what can we do in a world where every EV has a different max charging speed, every charging station has a different mix of rates, and some EV drivers may still need to charge to 100% to reach their destinations?

1. Let computers do the math

With EV charging rates changing every year, it’s not fair to ask consumers to know what charger is best for them. At the end of the day if someone sees a charger that says “350 kW” and another that says “150 kW” most people will choose the 350 kW option - even if their car can only charge at 77 kW.

The charging infrastructure, however, can easily know the max speed for each car and assign them to the best charger automatically. This would help avoid confusion for the customer and help keep charge times as low as possible for all cars.

2. Predict demand

Today’s EA app is very dumb. It shows you what’s currently available but isn’t able to forecast how busy a charging station will be. The app should have an idea of how busy a charger will by the number of views it has at any given time and could even include people who are navigating to the charger in the queue.

3. Use a queue

Most EV chargers today are first come, first served. This works ok for the first few cars, but once there’s a queue it can be confusing to determine who’s next. Additionally you never know when someone is going to charge to 100% and sit on a charger for over an hour.

The queue could be optimized for minimizing the total wait + charge time ensuring that chargers are assigned in an order that gets everyone through the queue as fast as possible.

4. Encourage charging to 80%

Rather than penalizing users for charging to 100% we can encourage them to charge to 80% to optimize charging times for all customers. Drivers who need the extra miles can still charge fully, but for those who don’t need to we can help them understand the extra time and cost of charging longer.

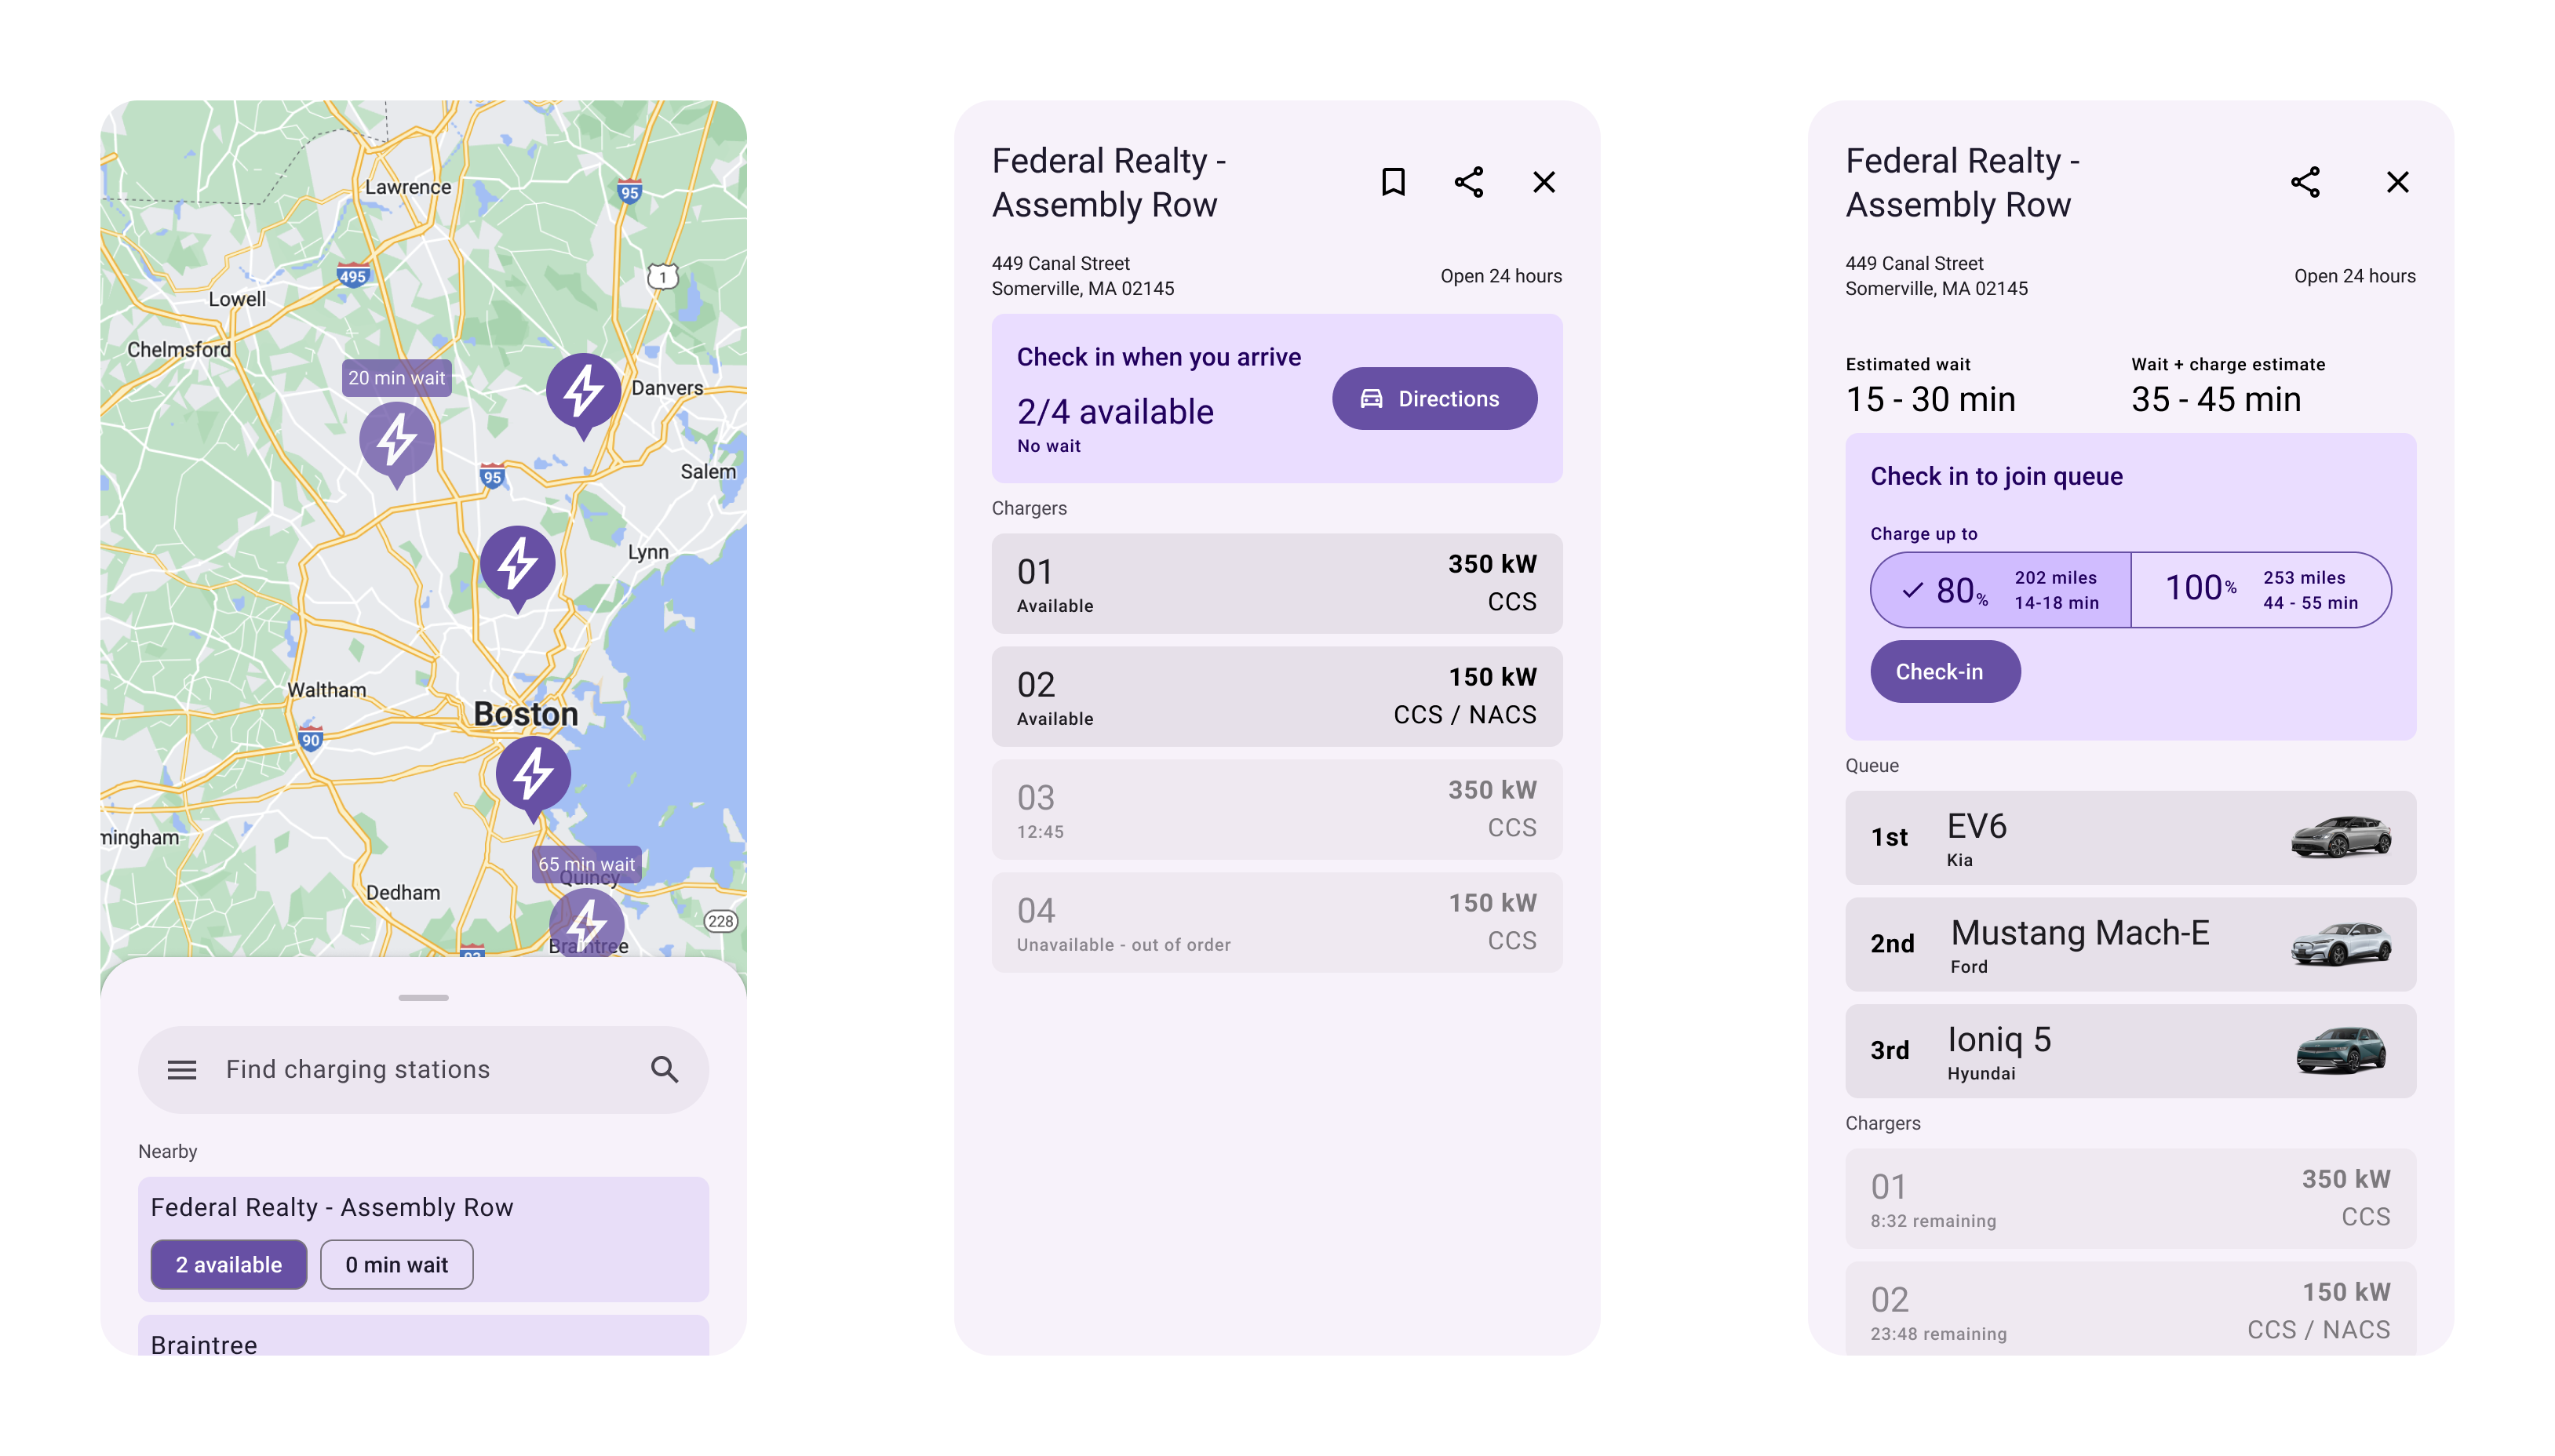
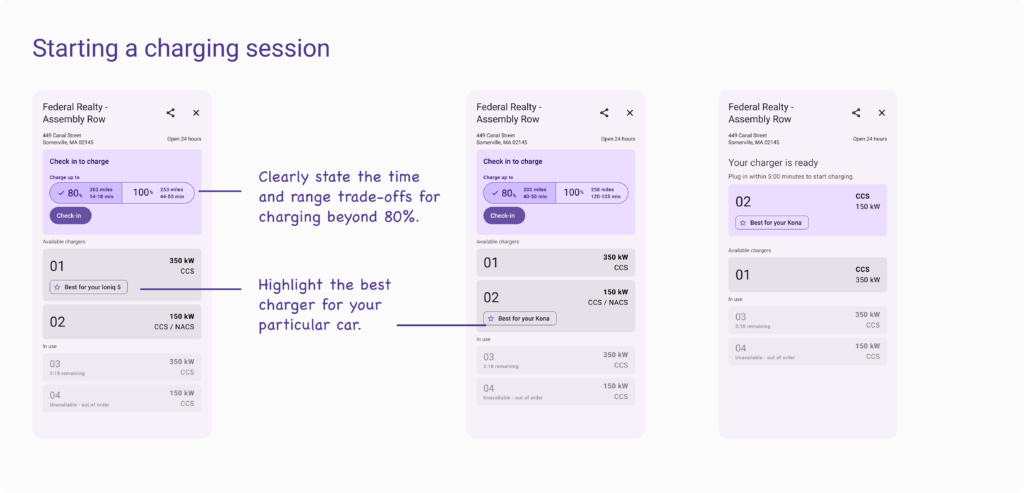
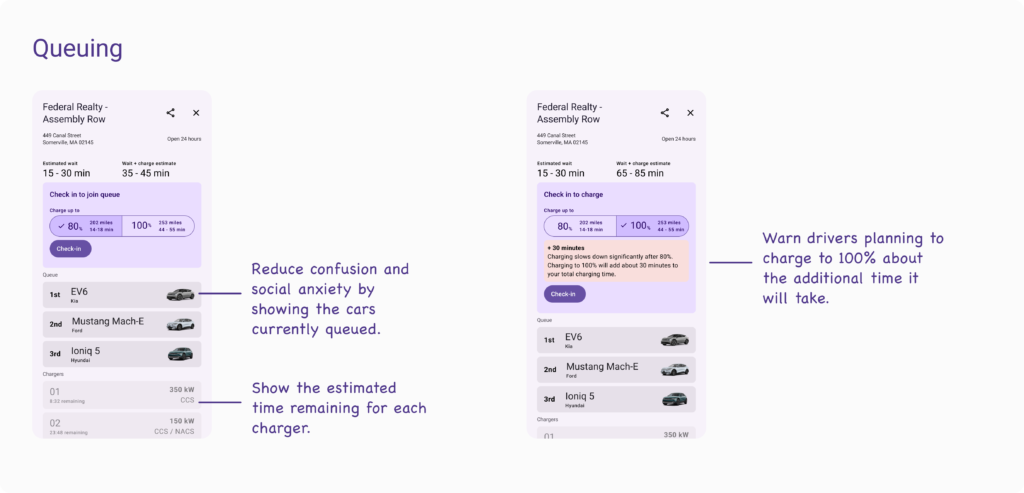
What could this look like?

When finding a charger the app could focus more on overall wait time rather than current availability.

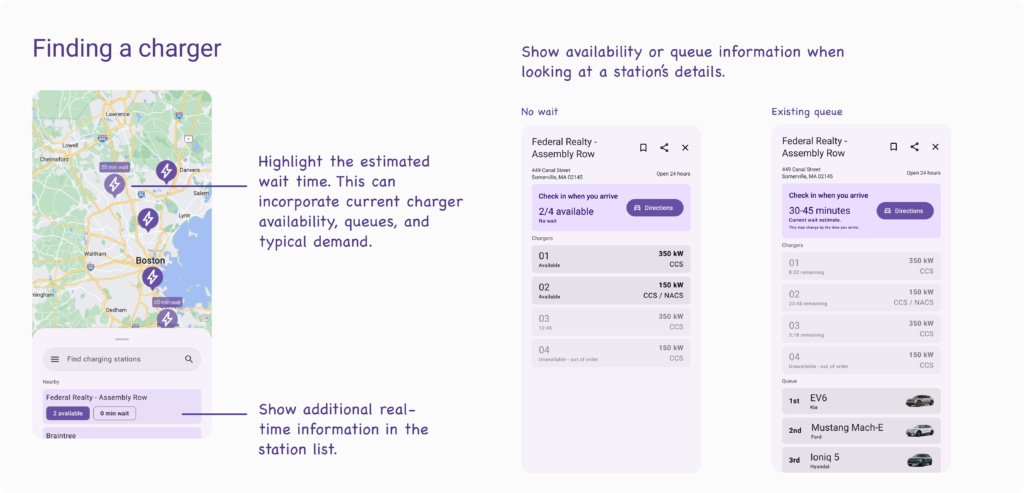
When a driver checks in the app can show them the estimated time difference for charging to 100%. Additionally the app can highlight which chargers best match your car’s max charging speed.

If no chargers are available, the app can show the estimated wait time as well as your total time at the station.

Thanks for reading!

This blog post is meant more as a conversation starter rather than a complete solution. I’d love to hear what you think about a queuing system, charging to 80% instead of 100% and all the other charging challenges out there today.

Send me a note on Threads to let me know what you think!

I also owe a huge thank you to my amazing wife Zara Fishkin who’s a principal content designer at Slack and helped me think through and edit this post.

FAQ

Why would Electrify America want to do this?

EA charges per kW delivered. They should want to maximize the number of cars they can charge in any given time period.

What about non-Electrify America chargers?

I mostly focused on Electrify America, but this all still applies to other chargers like EVgo and ChargePoint. Older Teslas also charge at different rates and superchargers from different generations have different max speeds.

What if someone wants to charge without using the app?

I totally agree. I selfishly ignored this in my thought experiment to keep things simple, but there are going to be plenty of drivers who want to charge without dealing with a number of apps. One idea would be to have charging stations provide a check-in kiosk for drivers without the app which could also show the queue and wait times like traditional gas stations show prices on large displays today.

What if I need to charge to 90%?

A driver can stop charging at any time. I’d originally started with a very flexible slider input so users could set any percentage as their target charge level, but decided to go back to 80% where speeds tend to start dropping and 100% which many drivers choose to charge to. These two options are enough to help estimate wait times and show the time / range trade-offs for a longer charging session.

November 8, 2021

How to migrate to a new computer with a Google Drive Backup

Google's Drive for Desktop has been my secondary backup strategy for a while now. It's a great complement to OSX's built-in Time Machine backup and helps to ensure that my backups are not tied to a single location.

Usually when I move to a new computer I use Apple's Migration Assistant to move everything from my Time Machine backup to the new machine. With my latest computer, however, I wanted to start with a fresh install to avoid migrating all of the built-up hidden files I've accumulated over the past 15 years or so. I thought using Drive to restore would be a great solution, but turns out it's not actually supported. When I signed in with the new computer I ended up with a second computer backup. There was no option to start by restoring an existing backup.

Two separate backup paths rather than one.

A 30 minute chat with Google customer support confirmed there's no supported path to migrate to a new computer, but I was able to find a workaround. I couldn't find this when Googling so I figured I'd write it up here in case it would help anyone else.

Migration steps

Use an existing backup (Computer A) to migrate to a new computer (Computer B).

  1. Make sure Computer A is completely backed up and your files are visible at drive.google.com.
  2. Log in to Google Drive on Computer B but don't add any local folders for syncing
  3. Drag folders at drive.google.com from Computer A to Computer B
  1. Choose the same folders to sync on Google Drive for Desktop
  1. Google Drive will warn you that these folders exist already and will ask you to confirm whether you want to merge them.
  2. Complete this step for each folder you want to sync. Make sure that your local folder on Computer B matches the name of the backup folder from Computer A.

Now you should be all set. Google Drive will merge your files from Computer A to Computer B and Computer B.

If you found this article useful, I'll always appreciate a PSL ?

July 31, 2021

Making an “on-air” light for my home office

The final product - an "on air" light when I'm in a meeting.

When my wife and I started working from home in March 2020 we settled into a routine where she’d work downstairs and I’d be in the bedroom upstairs. Since I'm on the bedroom our cat Angie is usually sitting on the bed right behind me - in full view of my webcam. This is great for paying the cat tax during meetings, but not so great when my wife wants to come give Angie some pets and I happen to be on a video call. After a few accidental meeting interruptions I knew there had to be a way to make it easier for her to know when the coast was clear for a cat visit - something like the "on-air" lights used in recording studios.

Our senior cat Angie enjoying some sunlight on the bed.

We already had a few Hue light bulbs in the house, so my first idea was to just turn a light on whenever I went into a meeting. I could do this pretty easily from my phone or Google Assistant, but I usually forgot to change the light which defeated the purpose.

Luckily I’d been exploring some DIY home automation tools and had bought a Raspberry Pi to try out Home Assistant, an open source home automation solution that can be run locally on your own WiFi (I wrote a bit about Home Assistant in Debugging the smart home) . It can run on a bunch of different hardware, but I wanted to keep things simple so I bought a Raspberry Pi starter kit from CanaKit and followed Home Assistant’s instructions to get things set up. With Home Assistant you don't even need to already have Hue lights. You can use any light the 100+ lights Home Assistant supports or even just smart outlet with a light plugged into it.

Here’s a quick walkthrough of my setup:

What I used

The steps

The first 3 steps involve setting up the Raspberry Pi and Home Assistant. I followed along with the online documentation for each step and will link it below. If you've already got it configured, skip to Step 4 to build out the automation.

Setting up Home Assistant

1. Set up Home Assistant on the Raspberry Pi

I followed the excellent guide on Home Assistant’s website with no issues. I chose to do the Home Assistant Operating System installation as recommended on their website.

2. Add the Hue integration in Home Assistant

Again Home Assistant’s excellent documentation makes this super simple. There’s even a single click button to add the integration from the site: https://www.home-assistant.io/integrations/hue/

3. Install the macOS (or Windows) Home Assistant Companion App

Direct link: https://github.com/home-assistant/iOS/releases/tag/release/2021.7/2021.202

Creating the Automation

Creating the actual automation is the only part not covered by Home Assistant’s documentation so I’ll walk through it in detail. We're going to create a scene that tells Home Assistant which lights to turn on, what color to make them, and how bright to set them. We'll then create an automation that tells Home Assistant to trigger that scene when the computer camera turns on and an automation to turn off the lights when your camera turns off.

1. Create a scene for your lights

  • Navigate to Configuration > Scenes > Add Scene in Home Assistant.
  • Name your scene and choose your light(s) from the devices list
  • Click the lightbulb to choose your brightness and color/temperature
  • Save your scene

2. Create your "on air" automation

  • Navigate to Configuration > Automations > Add Automation > Start with an empty automation
  • Name your automation and add a description. Leave the Mode at its default value of Single
  • Choose Device for Trigger Type
  • Select the computer you’ve installed the Companion App on
  • Choose “[computer-name] Camera In Use Turned On”. [computer-name] will be whatever your computer’s name is as registered with Home Assistant.
  • Skip conditions and leave as is
  • Choose Activate scene for your Action type and select the scene we made in step 4
  • Save your automation

4. Create your "off air" automation

  • Navigate to Configuration > Automations > Add Automation > Start with an empty automation
  • Name your automation and add a description. Leave the Mode at its default value of Single
  • Choose Device for Trigger Type
  • Select the computer you’ve installed the Companion App on
  • Choose “[computer-name] Camera In Use Turned Off”. [computer-name] will be whatever your computer’s name is as registered with Home Assistant.
  • Choose Device for your Action type and select your light
  • Choose Turn Off for the action.
  • Save your automation.

Now you’re good to go! If you set this up, run into issues, or have an interesting automation I’d love to hear about it on Twitter.

April 20, 2021

Debugging the smart home

My first ever smart home device were smart lights from Philips Hue a after graduating college. They were perfect when I just had a bedroom in a shared apartment. And more importantly they were fun! I could change colors, dim the lights, and pair them to movies. Over time the last 10 years I've slowly accumulated a bunch of smart devices from different companies to do different things.

At this point we're using connected devices to:

  • Control our outdoor lights
  • Control our indoor lights in rooms without light switches
  • Play music throughout the house
  • Ask questions to Google
  • Turn the TV on/off and launch streaming apps
  • Set timers in the kitchen
  • Look at recipes
  • Video call our family
  • Open / close the garage door
  • Lock our front door
  • Look for packages and ring our doorbell
  • Alarm and monitor the house while we're away
  • Control our small sprinkler system
  • And probably more

And I love it! It's awesome to be able to turn off all the lights in the house when I go to bed or to have the garage let me know I accidentally left it open. My absolute favorite feature to this day is being able to easily play music throughout the house just by asking Google. It still blows my mind. But sometimes things go wrong and something disconnects or dies and the whole system starts to fall apart.

Last week the lights in my living room stopped responding. Yesterday I found my wife on our front porch, locked out of the house by our dead Yale smart lock. Every day my office lights seem to flip a coin on whether or not they want to stay connected to WiFi. This isn't usually a big deal for me. I don't mind dealing with the troubleshooting most of the time. Unplug it, plug it back in and see if it's working. Reset the bulb and reconnect the WiFi. But as you add devices to the system the troubleshooting becomes more complex.

Lost connections

Recently IFTTT, a tool I've been using for years to connect various software and smart home services, decided to change their billing plan. Free customers would now be limited to three applets - the if this then that rules you use to connect two services - and the rest would be archived. At the time I'd been using IFTTT to:

  • Sync my Fitbit scale data with Google Drive
  • Connect Logitech's Harmony remote system with Google Assistant
  • Send me text messages for my basement water sensor around my water heater

The Logitech connection alone used multiple applets to let me control my TV, speakers, and Xbox from Google Assistant. So when IFTTT changed their plan the voice prompts I'd been using for years - "Hey Google turn the TV on" - suddenly stopped working. And sure IFTTT is well within their rights to adjust their pricing strategy, but the issue here is that when the connections between these devices are so fragile, even a small disruption from one service can ripple through our connected home.

Abandoned by the manufacturer

An even more concerning issue is when the device manufacturer's change which connections they allow or stop supporting their connected devices completely. In 2014 the startup Revolv launched a smart home hub to help customers make sense of all the different smart home standards. Customers could connect their different devices to the hub and then use Revolv's app to create custom actions - similar to IFTTT. People used this hub to create custom actions like turning on their sprinklers when a motion sensor was activated. In October of that year Nest acquired Revolv to help build out their Works With Nest platform that opened up Nest devices to third party platforms. Less than two years later, however, Nest decided to shut down the cloud servers that powered Revolv, breaking the custom connections Revolv customers had set up. And then three years later in 2019 Google ended all new connections for the Works With Nest program! New Nest customers would have to use Google accounts that no longer supported the same third party integrations. What a journey. And this is only one company! There are plenty of other examples of smart devices suddenly becoming dumb devices or completely useless paperweights.

Troubleshooting

Who can you call when your smart home breaks?

When these connections break, it's not always easy (or even possible) to repair them with other services. My 1930s house has plenty of old systems that are still in use. We have steam heat radiators, cloth-wrapped electrical wires, and a 1990s home security system. While each of these requires maintenance, each is independent and none rely on cloud servers managed by their manufacturer. They can even be repaired by non-manufacturer experts! If one of our outlets stops working it can be repaired by any electrician. Familiarity with these systems fades in time as technologies like steam are phased out, but a 90+ year lifespan is a far cry from the 3 years of Revolv's hub.

Our Yale smart lock automatically unlocks for me most of the time, but never unlocks for my wife. We're both signed in with the app, have given it the appropriate location permissions, tried reinstalling the apps, and even resetting the lock per Yale's customer support. None of it worked and we're left with a lock that works but not as expected and there doesn't seem to be anything we can do about it. Yale shipped us a new lock but the problem persists. Even when companies are aware of issues they don't always fix them. Just this week Wink customers have been left without a working device for over a week with no updates from the company. Sometimes those fixes never come and customers are left with broken devices.

Overlapping services

Another frequent challenge is the number of overlapping services you can end up managing. If you have the time and money you might be able to plan out your smart home to strategically use compatible devices, but for someone like me who's built up my system over time it's easy for the services to accumulate. I have smart lights from both Hue and Wyze which each have their own apps. I typically manage these through Google Home, but could also use Apple's HomeKit. When our bedroom lights dimmed unexpectedly I had to check both my Google Home and Hue apps to find an old Hue automation that dimmed the lights. A true smart home would help me figure this out.

For someone like me who's interested in technology and is frequently an early adopter this is tolerable. But what about people who don't have the time, inclination, or expertise to put up with all this? They're left buying into devices and systems that may or may not work as expected. Designers of these systems need to understand the complexities of the environments they will be operating in and the wide range of customers who will be interacting with them.

Designing for everyone

Even when the system itself seems to be working as intended, our failures to design for all users can lead to unfortunate challenges. At our house the Google Assistant seems to have a harder time understanding my wife. She often has to repeat her query or say "Hey Google" more than once before it will start listening. Unfortunately it's not just our house that has these issues. Voice recognition in general has been shown to have gender and racial biases as the training data used to create machine learning models is often an incomplete sample based largely on data available from white males. As reported by the NY Times, a 2020 study from Stanford showed that speech recognition systems "misidentified words about 19 percent of the time with white people. With black people, mistakes jumped to 35 percent." Understanding the reasons behind these failures, as well as the implications for customers, is crucial to help smart devices work for everyone.

So where do we go from here?

Smart devices are a fun way to bring technology and automation into our homes and while all the challenges I complained about above are real, it's not all bad news. There are a few things smart home consumers and smart home manufacturers can do to make all of our lives easier.

For consumers

Plan for graceful degradation

While I'd love to assume that each company behind my smart home devices will both continue to exist and support their devices for their entire lifetime I know that is unrealistic. For less expensive and novel items (like a color changing lightbulb) this might not be a big deal. For mroe expensive and/or longer-lasting devices (like a lock, smoke detectors, or security system) can look for devices that can continue working without a cloud-based service. You may lose some of the best features, but at a minimum it should be just as functional as it's dumb home relatives. A lock should still unlock without WiFi, a smoke detector should still yell at you even if the power is out, and your security system should still beep even if it can't send you a text.

Invest in companies with a good track record

Many companies already have an extended track record of long-term support. Investing in products from companies like this as well as strong companies that have been around for a while is a good way to hedge against the eventual shutdown of a smart device.

Open source and local solutions

Open source tools like Home Assistant openHABHome Assistant, and Hubitat let you build your own smart home hub and host it on your local network. For now it takes a decent amount of time and technical ability, but these services are making it easier and easier to run your own smart home system. I recently purchases a Raspberry Pi 4 to start experimenting with Home Assistant on my own to do things like turn a hallway light red when I'm on a meeting and check the battery level of my Yale door lock. Contributors are adding integrations to these services all the time and working to make them easier to set up and use. I'm hopeful that services like these will bring some power back to the consumer and maybe even let us use devices abandoned by their manufacturer.

For manufacturers

Diversify

Broadening our sample sizes and including customers and coworkers from traditionally underrepresented demographics can help create systems and services that work for more people. Those of us who work in technology should be thinking about how our products can work for people all over the world of different ages, ethnicities, income levels, education, and more. Everyone should be able to benefit from the efficiency and convenience smart, connected devices can bring. And as we continue to make these services work for more people, we need to continue ensuring that they work together and don't ask too much from the user.

Collaborate

To help with troubleshooting and setup, the systems we make should be able to easily talk to one another and there should be an easy way to see where a command came from. Who or what asked my lamp to turn on at 5am? We need to assume that customers aren't using these devices in a vacuum and are likely to have many other integrations, devices, and services running. It's up to us - not them - to ensure our products work well in that environment and that the customer can easily and successfully configure their system and troubleshoot when needed.

Open up

In an ideal world manufacturers would open source services they're shutting down so consumer can continue to use the product. This might be unrealistic but I think a realistic goal is to support additional integrations. If a company doesn't want to support a product then they should at least let the open source community continue to support it. Android's open source community is a great example of how old devices can be given an extended lifetime thanks to the developer community. I don't think we'll see something quite as flexible from smart devices, but if product teams start with more robust and powerful integrations it will be a fantastic start.

September 7, 2020

Calculating property taxes

TL;DR

In late 2019 we started the process of buying our first house and found estimating property taxes in NY to be more difficult than it should be. I learned how to calculate taxes, found a state-provided tax spreadsheet, and wrote a small web app to estimate property taxes on the go.

Overview

Late in 2019 my wife and I decided to move back east after a little over three years in the Bay Area. We started looking at homes in New York and while there's plenty we had to learn about the home-buying process, what really threw me for a loop was how important it was to calculate property taxes.

Understanding the tax implications of each property is essential in planning a budget. A property tax difference of just $833 per month means an extra $10,000 per year. Assuming you live in the home for 10 years you're looking at adding $100,000 to the total cost of your home.

But getting to this total property tax figure isn't an easy task. First, property taxes are complicated to calculate. The tax for each property is a sum of taxes from a number of different entities like the county, town and school district for that property. Second, unlike sales tax which is often shown as a percentage, property taxes are usually presented as a mill rate.

What is a mill rate?

According to Investopedia:

The mill rate is the amount of tax payable per dollar of the assessed value of a property. The mill rate is based on "mills." It is a figure that represents the amount per $1,000 of the assessed value of the property, which is used to calculate the amount of property tax.

https://www.investopedia.com/terms/m/millrate.asp

Ok so what does that mean for us? If you were to find a mill rate presented as a dollar value you could calculate the effective tax for that rate relatively easily.

mill rate * property value / 1000 = tax cost

For example:

A $20 mill rate on a $100,000 property would be $100,000 * 20 / 1,000 or $2,000.

As a first-time home buyer it was easier for me to think in percentages since it matched my model for other taxes. We can just move the decimal by one spot so that $20 mill rate becomes a 2% tax.

mill rate / 10 = tax percentage

To figure out what the tax impact of a property is going to be we need to start with adding up each of the individual taxes.

Multiple jurisdictions

Property taxes can be levied by a number of authorities for any given property. In New York state this means your effective property tax rate is the sum of:

  1. County tax
  2. City OR town and village tax
  3. School district tax

There may also be additional taxes for specific departments like the fire department. Finding the tax rates for each jurisdiction can be tricky. They're not easily searchable on Google and most search results show only county averages. Since the county is only 1 of multiple jurisdictions, however, taxes can vary significantly by property, making the average a less than ideal tool for estimating budgets. To determine the effective rate for any given property you need to get the tax rate from each of the separate agencies. Complicating things even further is the fact that a property can have a postal address for one town and be managed by another. If you live in a town you might also live in a village which applies additional taxes.

At first I tried finding rates on the county, city, or town websites. Not all municipalities listed this information publicly and some of it wasn't up to date. When I did find information it was presented in spreadsheets I had to download and parse. I started keeping notes for the tax rate as a percentage for each of the towns and villages we were looking in.

Building a calculator

I eventually lucked out and was able to find a state-wide list of property tax rates for each county, city, town, and village in New York. With this spreadsheet I could find the taxes for each entity and add them together for each house we were looking at. This worked well for houses we planned to visit in advance, but we'd often find new homes as we were visiting others. I wanted a quick and easy way to calculate taxes at any time from my phone which created the perfect opportunity for a mini web app.

I converted each of the tax spreadsheets into JSON and wrote a set of filters to show only the appropriate school districts and villages within a city or town. As you select each entity the following entities are filtered so you never have to worry about finding / matching the correct villages with your selected town.

Next I added an optional field to capture the estimated property value so you can see the actual tax implications in dollars. The results table shows the mill rate, tax rate as a percentage, and the total cost per year while showing the rates for each entity.

I used Bulma to simplify my CSS and wrote the rest in vanilla JS and HTML. Since there is nothing to save, hosting was as simple as pushing a new folder to my personal website. I made the site mobile friendly so I could visit it from my phone and it ended up coming in pretty handy as we looked for a home.

What I would do next

I'm not sure what the property tax situation is in other states, but if it's as confusing as it is in NY then I think it would useful to add additional states to the app. It would also be great to be able to save particular property tax estimates so you can keep track of multiple properties instead of having to fill out the form each time. Finally I didn't look into how this would work for other types of properties. I'm not sure how condos or rental properties are taxed for example. It'd be great to extend this to include more property types in the future. For now, however, the calculator got the job done for me and I've had plenty of home projects to keep me busy in a nearly 100 year old home.

October 19, 2019

What (and who) smart locks leave behind

Earlier this year the property management for my apartment building gave us notice that all apartments would be upgraded with smart home technology by Smart Rent. We were given a brief notice via email and a meet and greet to ask a few questions. A few days later they replaced each apartment lock with a Yale smart lock and texted us our PIN.

Image result for yale smart lock

In general I’m a huge fan of our increasingly connected world. I’ve worked on home security cameras that help families find peace of mind and delivery robots that make hotel guests and staff feel safer by delivering to guest rooms late at night. Every day I ask Google to play music while my wife and I cook dinner or clean the apartment. When it comes to connected devices and the smart home I tend to be an early adopter and have been looking forward to a smart lock for years, ever since the beautiful August smart lock was announced.

Unfortunately the reality of living with a smart lock has been mostly disappointing with one major benefit. Let's start with the highlight and then dive into some of the challenges.

Dynamic codes and peace of mind

Hands down the best part of a smart lock is being able to share temporary codes. This mostly comes in handy for us when we're traveling so that we can have a friend stop by to water our plants. Our landlord limits the code window to 48 hours, but for our use case that's plenty of time.

Sending a code is relatively easy, but it does require providing Smart Rent with our friend's email or phone number. It's not clear why they can't just generate a code that I can share myself and this does raise some privacy concerns for me (more on that later).

In addition to the convenience of temporary codes, the lock also lets me check its status from wherever I am. If I ever think I've left the door unlocked it's just a few swipes and taps to make sure. I can even lock the door via Google Assistant for added convenience. The lock could definitely be smarter here by knowing when I come and go based on location or bluetooth proximity, but I'm ok trading some extra legwork for the added privacy here.

So if the lock adds convenience and peace of mind then what is that mostly disappointing part I was talking about? My concerns and frustrations boil down to two primary categories: usability and accessibility, and privacy and security. I'll be tackling each in a separate blog post.

Let’s start with usability and accessibility

Sometimes the old ways are best, however, and sometimes the best interface is centuries old. Let’s break down using a traditional key.

1. Remove key from pocket
2. Insert key into keyhole (this may require some fiddling)
3. Twist key
4. Turn handle and open door
5. Remove key
6. Twist knob to lock the door from inside

In theory, a digital smart lock can help reduce these steps. I no longer need to find or insert a key so steps 1-3 go away. Now all I have to do is:

1. Enter my pin
2. Turn handle and open door
3. Twist knob to lock the door from inside

We’ve cut the process in half! Not only does a digital lock save steps, but it also has those super useful temporary pins.

Unfortunately the physical / digital interface introduces more complexity and failure points than the traditional physical-only lock.

A touch screen

Gone is the physical affordance of a lock and key. Instead of a key we can insert and turn, we now have a blank sheet of glass. Remember the PIN code management emailed us? Let's use it to unlock the door.

1. Activate the touch screen by placing your palm over the screen.
2. Enter your four digit PIN.
3. Hit the check mark to confirm
4. Wait for the motor to finish moving the bolt
5. Enter your apartment
6. Manually turn the knob on the inside of the door to lock the door

Within each of the steps there are a number of possible failure points and complications.

Step 1: Activate the touch screen

For new users there's no guidance on how to activate the screen. The only way to activate it is by placing your palm over the whole screen - a simple touch isn't enough. I'm not sure someone would figure this out without reading the documentation other than a lengthy battle of trial and error. Even when you know what to do, getting your palm flush with the door can be tricky given the hip-height placement of the lock and the flush alignment against the door.

Yale could improve on this by waking the touch screen on a tap or an extended press. If the screen were angled up towards the user the angle would be easier to achieve, especially for someone with tight forearms from rock climbing like me.

Step 2: Enter your PIN

Now that we've activated the screen we need to enter our code. The screen is a typical touch screen but lacks additional forms of feedback like haptics or sound. The only feedback that you've hit a button is a brief flash. With the lack of physical buttons and the close proximity of each number it's pretty easy to hit a number accidentally. Unfortunately there's no backspace so if you make a mistake you have to hit the checkmark, wait for a wipe animation, and start again back at step 1.

For someone with impaired vision unlocking the door would be nearly impossible. Theoretically you might be able to use the voice assistant or accessible smart phone apps, but both still require significantly more interaction than finding a physical keyhole.

Just because you can see the buttons, however, doesn't mean you can press them. What happens if you have your hands full of groceries, children, or are someone living with a disability? Making the precise movements to enter your code without accidentally hitting the wrong number is going to be a challenge.

What kind of message does this send to renters? Oh you’re blind? Too bad you won’t be able to open your front door. Oh you’re frail or have Parkinson’s Disease? This isn’t the place for you. You’re a parent carrying a baby in one arm with two bags of groceries on the other? Good luck making precise movements to hit your PIN just right.

Adding physical buttons could help both avoid accidental touches and also help visually impaired users find the right keys. I understand these could become worn over time and reveal your pin, but touchscreens show fingerprints and a rotating PIN could help avoid wear and tear on a limited set of buttons.

Steps 3 and 4 aren't too bad, other than taking some extra time for the motor to open the lock.

Step 5: Enter your apartment

The next big problem point happens as you're entering your apartment. When the door is unlocked, placing your palm against the screen locks the door. It's easy and convenient when you're leaving, but can you see the problem when you're entering?

As you're holding the door open, it's easy to accidentally cover the lock with your arm, hip, or back, extending the lock and preventing the door from closing. Luckily you're inside now so you just have to rotate the knob to unlock and then re-lock the door. The lock is too difficult to activate when you're trying to unlock the door and too easy when you're entering your apartment.

A "smart" solution here could be to use a simple sensor to know whether the door is closed. With the door closed, placing your palm on the screen could lock the bolt, and when the door is open accidental touches could be ignored.

Accessibility and usability

So many of the usability challenges with the Yale smart lock become even greater barriers for people in "complex" situations like carrying groceries or for people living with disabilities. Designing for inclusivity would make this a more user friendly product for everyone. Just because it's a smart lock doesn't mean we need to lose the benefits of physical, tactile interfaces like a lock and key.

January 17, 2019

Codea on Menus in iOS

I've been using an iPad Pro on and off for the past year and have yet to find a way to use it as my daily work machine. Some of this is due to missing applications like Sketch or Adobe XD, but also in the limitations of most iOS apps. Mobile apps are simple, accessible, and focused, but don't typically offer the robustness of desktop counterparts.

Codea recently addressed this gap as co-creator Simeon wrote in a recent blog post:

I realised six months ago as I was using my Mac, using the menus, that I need these things — menus — in Codea. I was trying to solve a problem that has been solved for decades.

So I set out to make the best menus I could make for iOS.

For simple apps, menus aren’t necessary, and that’s great.

But Codea isn’t a simple app and there’s nothing I can do about that.

What it can be is discoverable. Compared to all the options I considered, menus are exactly that, discoverable. You pull down a list of named features complete with shortcut keys (if a keyboard is attached). Then you activate that feature by tapping on it, or by dragging your finger and releasing.

Hamburger menus, side-drawers, whatever you want to call them, are a conventional way to bury additional and often unrelated functionality into an app. But they are much heavier than the good old-fashioned menu bar. They often pull out a whole modal side-thingy, maybe they slide all your content to the right. It’s a context switch for your brain.

Menus categorise items under common, plain-text headings, and they appear and disappear without fanfare.

I wanted menus that looked beautiful, looked like iOS, and felt great.

https://codea.io/blog/the-ios-menu/

Simeon perfectly describes the missing component in many of today's productivity apps - discoverability. Features and complexity are often dropped for the sake of simplicity, sacrificing the value of the app. But Simeon doesn't just stop at adding menus to Codea, he dives deeper in a second post to focus on the interactions.

The other interaction I really needed for this menu was something I first noticed in Procreate, an iPad app for painting. It uses popover menus to allow the user to change tools and colours. Standard iOS popovers require the user to tap outside the popover to dismiss it before she can interact with the background. In Procreate, you can just start drawing and the popover dismisses.

This behaviour gives the menus their lightweight feel. They don’t stutter your interactions with the rest of the system. The clip below shows what happens when you scroll the editor with an open menu.

There are so many great details in this piece, but I particularly love how he handled scrolling for various device sizes and his brilliant implementation of dynamic button colors for increasing legibility (see the video).

February 11, 2018

The quantified self: Wedding edition

Who says you can't quanitfy love? I tracked my heart rate during our wedding ceremony in September and time-stamped a few highlights with the help of photos from family, friends, and our official photographer. I tried a few different tools for creating the chart (Google Sheets, Numbers, Sketch, etc.) but eventually landed on Plot.ly for the interactive annotations.


Plot 2

I wore the heart rate monitor under my shirt cuff to keep it out of the photos and against my skin. I'm sure it moved around a bit, but I was happy to see repeated measurements even after some of the steep drops or climbs.

Waiting for it to begin

www.sethkaye.com

My heart rate climbs slowly but steadily towards the beginning of the procession. The wedding party waited inside for everyone to be seated before the procession started. We could see the guests arriving, chatting, and getting to their seats through the windows of the auditorium we were waiting in. I definitely got more and more nervous watching and waiting.

Calm during the vows

A lot of friends and family have pointed out how the vows and then exchanging the rings seemed to calm me down a lot. It definitely did. I think part of the calm came from the most normal moment in the entire wedding. The whole day is this crazy ordeal. The two of you are the center of it, but it's not really about you. It's about celebrating with your friends and family, making sure the buses arrive when they're supposed to, remembering how slowly you have to step to take up all the time of the music during the processional.

But when it came to the vows it's really just the two of you again. Vows can be cliche and overplayed, but at the end of the day it was just me and my wife telling each other how we felt. Sure everyone else was there, but the words were just for us.

The glass

Oddly enough I was most nervous about this. Stepping on a wine glass isn't the most natural thing in the world. Not only that, but my father-in-law warned me not to step too hard as he'd actually injured his ankle at his wedding. You don't really get to practice either - unless you order extra glasses or have some at home you're not fond of.

Needless to stay I stepped a bit too delicately and needed a second attempt. If my heart rate wasn't up from the nerves it definitely was up from the embarrassment!

Blurred for friends privacy

Full day

Here's the full day chart from the actual Fitbit app. It's crazy to me that breaking the glass topped everything - including dancing at the reception!

November 16, 2017

How Twitter solved the character problem for different languages

Great writeup from Josh Wilburne of Twitter detailing the challenges of designing for the 140 character limit across the world. Two major aspects that stand out:

Automatic density-based adjustments

With this in mind, we designed a system that defines two types of written languages, dense and non-dense, and expands the character limit for non-dense languages.

Continuous insight

While I thought removing the UI until it was relevant would help alleviate the stress of the character limit, it ended up having the opposite effect; people were unable to properly plan their Tweet since they had no feel for how far along they actually were.

There's plenty to debate in the final implementation (as there always is in design), but I love the outside box thinking to classify languages, adapt automatically, and to show progress throughout composition, regardless of the language.

August 5, 2017

Commitments in the age of bailing

A recent New York Times article from David Brooks visits contemporary bailing culture, where it's become easier than ever before to commit to something and then back out last minute. Before smart phones and the ever-present internet, canceling was so much more difficult and time consuming. I first noticed (and started participating in) the bail culture primarily through events scheduled via Facebook. The RSVP system made it so simple to reply yes to something that Yes basically became a sign of support rather than an actual RSVP. Friends were essentially saying "Sounds like fun!" rather than "I'll definitely be there". Maybe (now Interested) provided an even more explicit endorsement of bailing. One could have the appearance of support without the burden of committal. When hosting parties and events I quickly learned to only expect the Yes's and even then to be prepared for a few "so sorry, but I'm swamped with work" texts last minute.

While I'm definitely not a stranger to bailing, especially on Friday night commitments after a long week with the couch and Netflix beckoning me home, there's no denying that there is a cost to the false commitment culture. How many times can a person bail before inviting them starts become a second thought. What is the value of a friendship when it's not worth committing to?

To help combat these tendencies, Mr. Brooks recommends three simple bail barriers:

First, is it for a good reason (your kids unexpectedly need you, a new kidney became available for your transplant) or is it for a bad reason (you’re tired, you want to be alone)?

Second, did you bail well (sending an honest text, offering another date to get together) or did you bail selfishly (ghosting, talking about how busy your life is, as if you were the only person who matters)?

Third, did you really think about the impact on the other person? (I’ve learned it’s almost always a mistake to bail on somebody’s life event — wedding, birthday party, funeral — on the grounds that your absence won’t be noticed.)

I try to challenge my own bailing instinct and I love the idea of thinking through a specific lens. Why do I want to bail? How should I communicate it? And is it really something I shouldn't skip out on for the sake of the other party? I'll take this one step further and add an addendum to #3, how would feel if the other person were bailing on me. A little bit of empathy and sympathy can go a long way. So here's to making some commitments and actually showing up!

Designed by Will. 

Built with Wordpress, Semplice, and some homemade HTML, CSS, and Javascript.